A list of pipe standards for boiler and heat exchanger


Outer diameter tolerance
Unit mm
| Outer diameter class | Outer diameter tolerance | ||
|---|---|---|---|
| Hot finished seamless steel pipes | Cold finished seamless steel pipes | Automatic arc welding seamless steel pipes Lazer welding seamless steel pipes Electric resistance welding seamless steel pipes |
|
| less than 40 | +0.4 -0.8 |
±0.25 | ±0.25 |
| greater or equal 40 less than 50 | |||
| greater or equal 50 less than 60 | |||
| greater or equal 60 less than 80 | ±0.30 | ±0.30 | |
| greater or equal 80 less than 100 | ±0.40 | ±0.40 | |
| greater or equal 100 less than 120 | +0.4 -1.2 |
+0.40 -0.60 |
+0.40 -0.60 |
| greater or equal 120 less than 160 | +0.40 -0.80 |
+0.40 -0.80 |
|
| greater or equal 160 less than 200 | +0.4 -1.8 |
+0.40 -1.20 |
+0.40 -1.20 |
| greater or equal 200 | +0.4 -2.4 |
+0.40 -1.60 |
+0.40 -1.60 |
Notes: 1. It applies for outer diameter tolerance of ferrite type cold finishing seamless pipes, automatic arc welding pipes, Lazer welding pipes, and electric resistant welding pipes. If the outer diameter is less than 25mm, the tolerance is ±0.10mm, greater or equal 25mm/less than 40mm is ±0.15mm, greater or equal 40mm/less than 50mm is ±0.20mm.
2. You can order the tolerance of cold finishing seamless pipes, automatic arc welding pipes, Lazer welding pipes, and electric resistant welding pipes as ±0.20mm when it is less than 40mm.
Thickness and thickness deviation tolerance
| Tolerance | Thickness class mm | Hot finished seamless steel pipes |
Cold finished seamless steel pipes | Automatic arc welding seamless steel pipes Lazer welding seamless steel pipes Electric resistance welding seamless steel pipes |
|||
|---|---|---|---|---|---|---|---|
| Outer diameter class mm | |||||||
| less than 100 | greater or equal 100 | less than 40 | greater or equal 40 | less than 40 | greater or equal 40 | ||
| Thickness tolerance % | less than 2 | - | - | +0.4mm 0 |
+22 0 |
+0.4mm 0 |
+22 0 |
| greater or equal 2 less than 2.4 |
+40 0 |
- | +20 0 |
+20 0 |
|||
| greater or equal 2.4 less than 3.8 |
+35 0 |
+35 0 |
|||||
| greater or equal 3.8 less than 4.6 |
+33 0 |
+33 0 |
|||||
| greater or equal 4.6 | +28 0 |
+28 0 |
|||||
| Thickness deviation tolerance % | - | less or equal 22.8% of the thickness | - | - | |||
Note:Thickness deviation is a proportion of the difference between maximum thickness and minimum thickness on the cross section, apart from less than 5.6mm pipes.
Length tolerance
| Class | Length tolerance | |
|---|---|---|
| Outer diameter less or equal 50mm | Length less or equal 7m | +7mm 0 |
| Greater than 7m | At every 3mm and its fractal added, the plus-side tolerance is also added 3mm. Maximum 15, nonetheless. |
|
| Greater than 50mm | Length less or equal 7m | +10mm 0 |
| Greater than 7m | At every 3mm and its fractal added, the plus-side tolerance is also added 3mm. Maximum 15, nonetheless. |
Notes: A tolerance depends on an agreement with the parties if the order required higher accuracy.

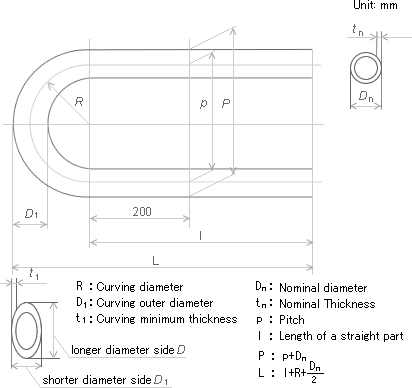
Attached document 2 (regulations) U-shaped pipes
A vendor process U-shape curving when a customer requested.
1. Method: manufacturing method is below. (see Doc 2, figure 1)
a) It is made with cold curving process and its curving diameter must be greater or equal to 1.5 times as wide as outer diameter of the pipe.
b) Generally hot finishing is not done with a part of the curve unless there is a specific request.
2. Appearance: there must not be a fault which critically affect in use.
3. Tolerances of a part of the curve, an amount of change, decrease rate of the thickness, pitch or size of pitch are based on Document 2 figure.1. A tolerance of the length after curving is based on figure 2.
4. Measurement method of a part of the curve is to take a sample from the other curving pipes, which is same in size and minimum curving
diameter as the product, and was made in the same period. Then measure thickness of 2 directions such as shorter side and longer side on 90°
of the sample's part of the curve (see document 2 figure 1 D1 size), totally 4 points on the circumference. Finally calculate
the amount of change and the thickness decreasing rate.
Document 2 figure.1

Document 2 figure.1 Tolerance of a part of the curve
 |
 |
Pitch(p) or tolerance of pitch mm | |
|---|---|---|---|
| shooter diameter side | longer diameter side | ||
| less or equal (Dn/4R)×Dn Minimum amount of change must be 0.5mm. |
less or equal (Dn/8R)×Dn Minimum amount of change must be 0.5mm. |
 |
±1.5 |
Document 2 figure.1 Tolerance of length of the curving pipe
| Straight part length after curving | Tolerance of length (l or L) mm |
|---|---|
| Length less or equal 7m | +7 0 |
| Greater than 7m | +10 0 |


